How to change nameservers is a five-minute job at your domain registrar, but the minutes before it matter more. Nameservers decide which company answers for your domain’s DNS, so switching them moves your website, email and verification records to a new place in one step. If the new place is missing a record, that service stops working.
This guide follows Cloudflare’s and GoDaddy’s current help documentation, plus the ICANN and auDA lookup tools. It was checked on 9 November 2026.
What nameservers actually control
GoDaddy’s help page puts it simply: there are always at least two nameservers for a domain, and when you change them, the place where you manage DNS changes too. If your domain uses your registrar’s nameservers, your DNS records live in your registrar account. Point the nameservers at a host or a DNS provider, and the records you edit are now in that company’s dashboard instead.
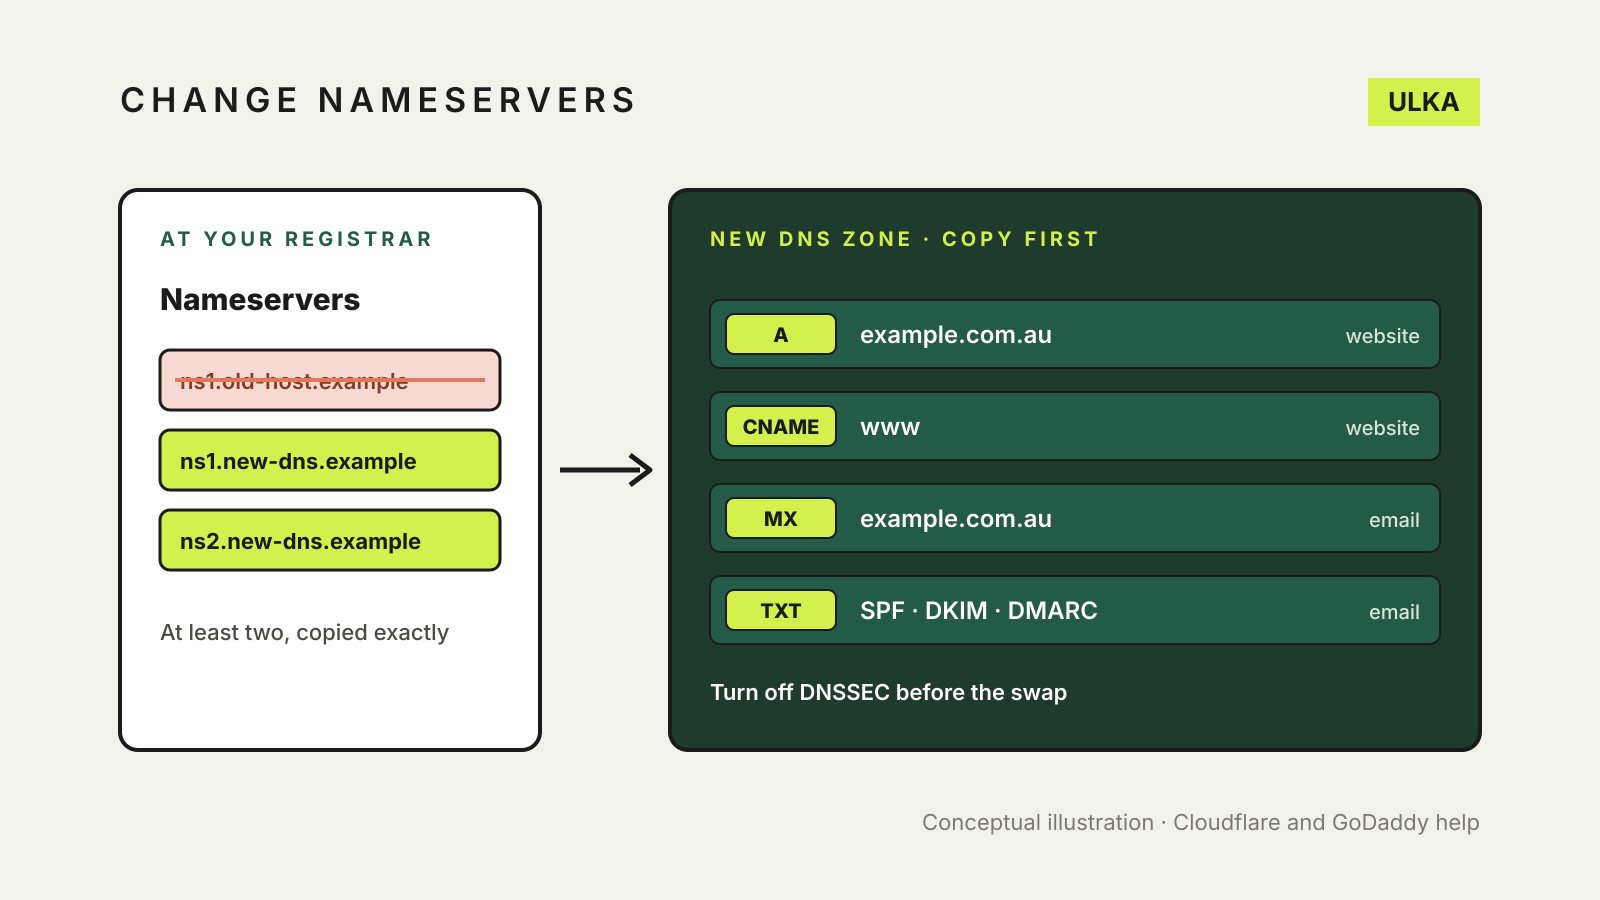
That is why a nameserver change is different from editing one record. Changing an A record moves your website. Changing nameservers moves every record at once: the website, the www address, email (MX), and the TXT records used for SPF, DKIM, DMARC and service verification.
You usually change nameservers when:
- you move to a new host that asks you to use its nameservers;
- you put a CDN or DNS service such as Cloudflare in front of your site;
- you want to manage DNS at your registrar again after leaving a host.
If your new host only needs your website to point at it, adding or editing an A or CNAME record at your current DNS provider may be enough. Ask before you change more than you need to.
Step 1: Find your registrar and current nameservers
You change nameservers at the registrar, the company your domain is registered through, which is not always your host. Cloudflare’s setup guide suggests ICANN Lookup if you are not sure who that is. For .au domains, use the auDA WHOIS service, which shows the registrar managing an .au licence.
Write down the current nameservers before you change anything, so you can switch back if something goes wrong.
Step 2: Copy every DNS record to the new provider
This is the step that prevents outages. Before the switch, the new provider must already hold all the records your domain needs. Cloudflare’s full setup guide says its automatic scan is not guaranteed to find every existing record, and asks you to check in particular:
- the record for the bare domain (
example.com.au), usually an A, AAAA or CNAME; - subdomain records such as
www; - email records: MX records and TXT records for SPF, DKIM and DMARC.
Cloudflare warns that activating a domain without the correct records can leave visitors with DNS_PROBE_FINISHED_NXDOMAIN errors. GoDaddy’s page makes the same point from the other side: changing nameservers “may break existing connections to your website or email”.
Export or screenshot the full record list at your current DNS provider, then compare it line by line with the new one. Our guide to SPF, DKIM and DMARC explains which email records matter and what they look like.
Step 3: Turn off DNSSEC first, if it is on
DNSSEC signs your DNS answers so they can be checked. Cloudflare’s guide says that if DNSSEC is active, you must turn it off at your registrar before replacing nameservers, because changing them while DNSSEC is on “can cause your domain to become unreachable”. You can turn it back on with the new provider once the domain is active. Cloudflare does document an advanced multi-signer method for providers that support it, but for most small sites switching DNSSEC off first is the simpler path.
Step 4: Replace the nameservers
At the registrar, find the nameserver setting for the domain. On GoDaddy, Domain Settings, then DNS, then Nameservers; choose “I’ll use my own nameservers”, enter the new ones and save. Other registrars use similar wording, such as “custom nameservers”.
Two details from Cloudflare’s guide:
- Remove the old nameservers rather than adding the new ones beside them.
- Copy the new names exactly. A typo means your DNS will not resolve correctly.
Step 5: Check the change has taken effect
Changes are not instant everywhere. GoDaddy says most DNS changes take effect within an hour but can take up to 48 hours to update globally. Cloudflare says to allow up to 24 hours for the registrar to update your nameservers.
To check, Cloudflare suggests commands such as nslookup -type=ns example.com.au 1.1.1.1 on Windows or dig ns example.com.au @1.1.1.1 on a Mac or Linux. Once the new nameservers appear, test the site, send and receive a test email, and check any service that relies on a TXT record, such as a website builder or Google Search Console verification. Then re-enable DNSSEC at the new provider if you turned it off.
Avoid changing nameservers mid-move
If you are also transferring the domain to a new registrar or migrating a site, do one change at a time. Our guides to transferring a .au domain and migrating WordPress to a new host cover those moves. If you are choosing a host first, see our hosting services comparison.